Chapter 03
Doors
A door in the panel is the thing people walk through. It has a name, an optional description, a fail behaviour, a held-open alert time, and a mapping to the controller channel that physically drives it. Everything else (who may open it and when) is decided by access levels, not on the door itself.
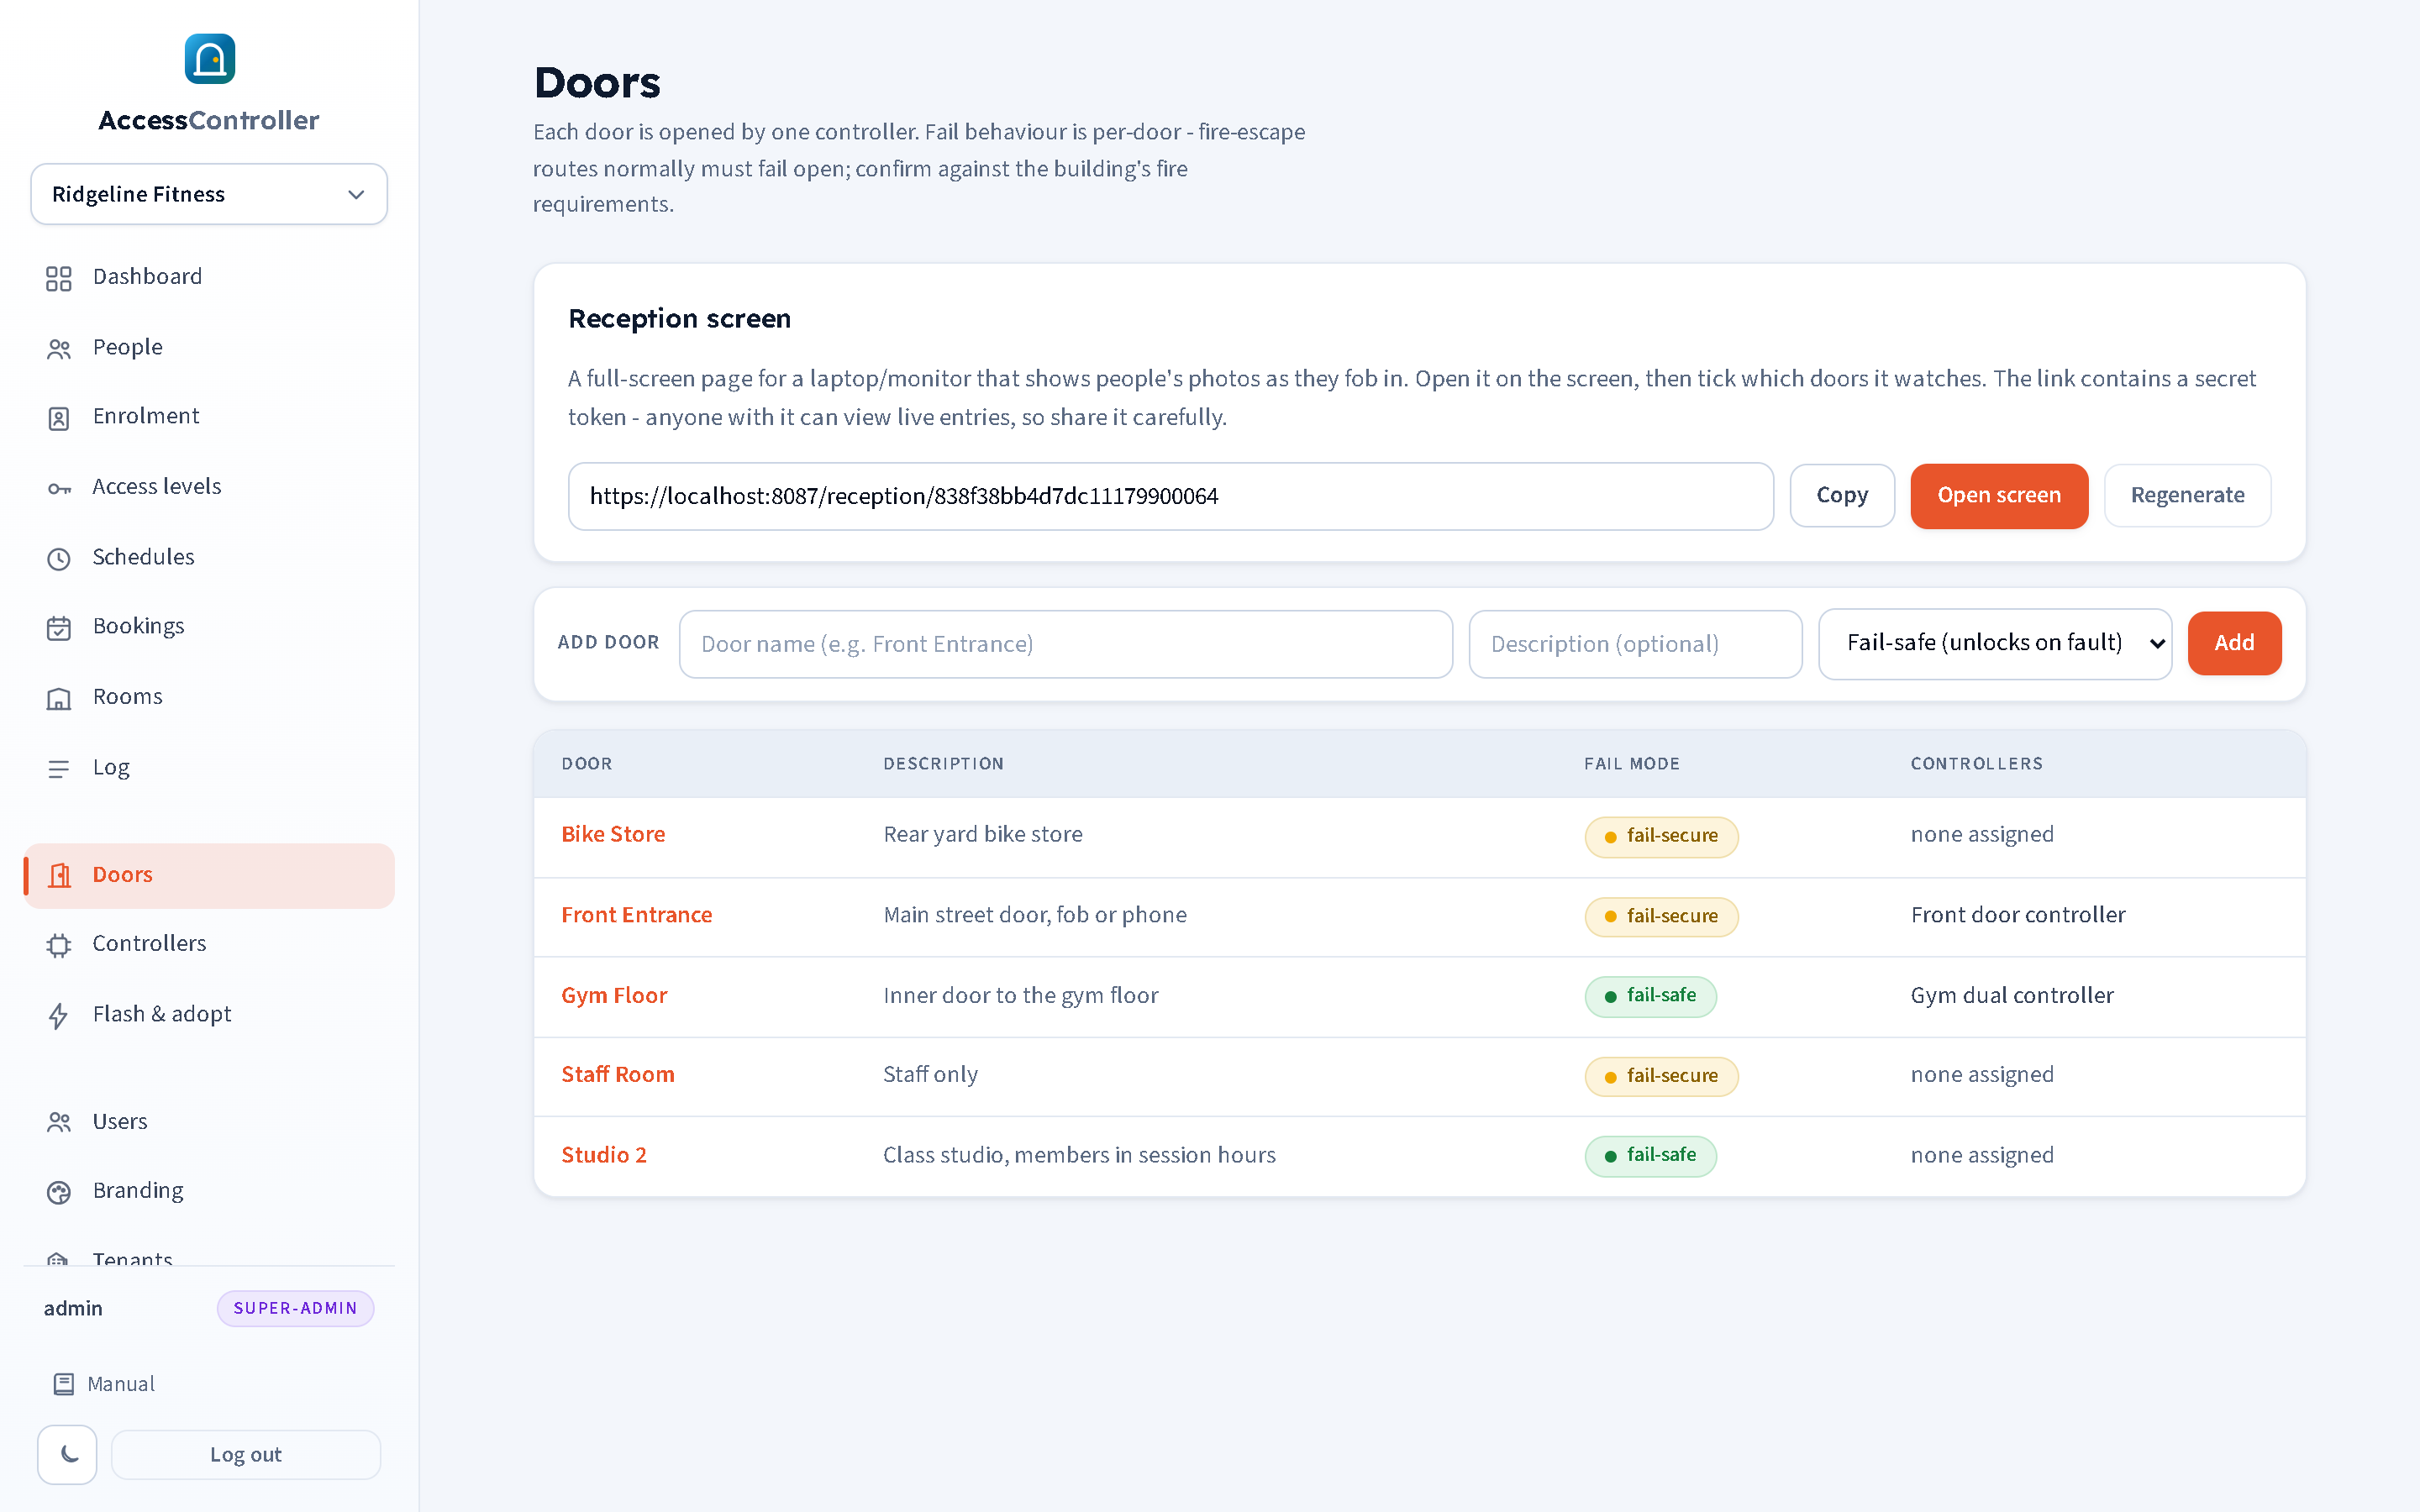
Adding a door
Open Doors in the sidebar. In the Add door toolbar:
- Type a Door name, for example "Front Entrance", "Gym Floor", "Studio 2". Names are shown in the log, on the reception screen, in phone menus and in access levels, so keep them short and unambiguous.
- Optionally add a Description such as "Main street door, maglock".
- Choose the fail mode: fail-safe or fail-secure (see below).
- Press Add.
The door appears in the list. The Controllers column shows which controller drives it, or "none assigned" until you map one (chapter 5).
Click a door's name to open its detail page.
Fail-safe or fail-secure
Every door records how its lock behaves when power or the controller fails:
- Fail-safe: the lock releases when power is lost. This is how a maglock works: it holds only while energised. The door is open in a fault.
- Fail-secure: the lock stays locked when power is lost. This is how most electric strikes work: the latch is held until the strike is energised. The door is closed in a fault.
Warning: fire escape routes. A door on a fire escape route normally must fail open so that people can always get out. Choosing fail-secure for such a door, or wiring a maglock without a break-glass or a fire-alarm interface, can trap people in a fire. The panel records your choice so that it is visible to everyone, but it cannot check your building. Confirm every door's fail behaviour against the building's fire risk assessment and the local fire authority's requirements before the site goes live, and keep the exit button and any break-glass unit on the inside of every fail-safe door.
The fail mode setting is a record of intent. The actual behaviour is fixed by how the installer wires the relay (normally-open versus normally-closed contact) and by the lock type. The controller's relay is de-energised at power-up and between pulses, so:
- for a maglock (fail-safe) the relay contact carries the lock supply and the lock drops when the relay pulses or the power fails;
- for a strike (fail-secure) the relay pulse energises the strike to release it.
The relay switches the lock's own power supply; it must never carry the controller's supply. Lock power should come from a separate, battery-backed supply. Fit a flyback diode across maglock coils. Chapter 5 has the wiring detail.
Held-open time and door pulse
Two timings matter for a door:
- Relay pulse: how long the lock is released after a granted scan, exit button or remote unlock. The default is 4000 ms (4 seconds). It is set per channel under Settings > Channel 1 wiring and Channel 2 wiring (chapter 13) and written to the controller when it is provisioned or re-pointed.
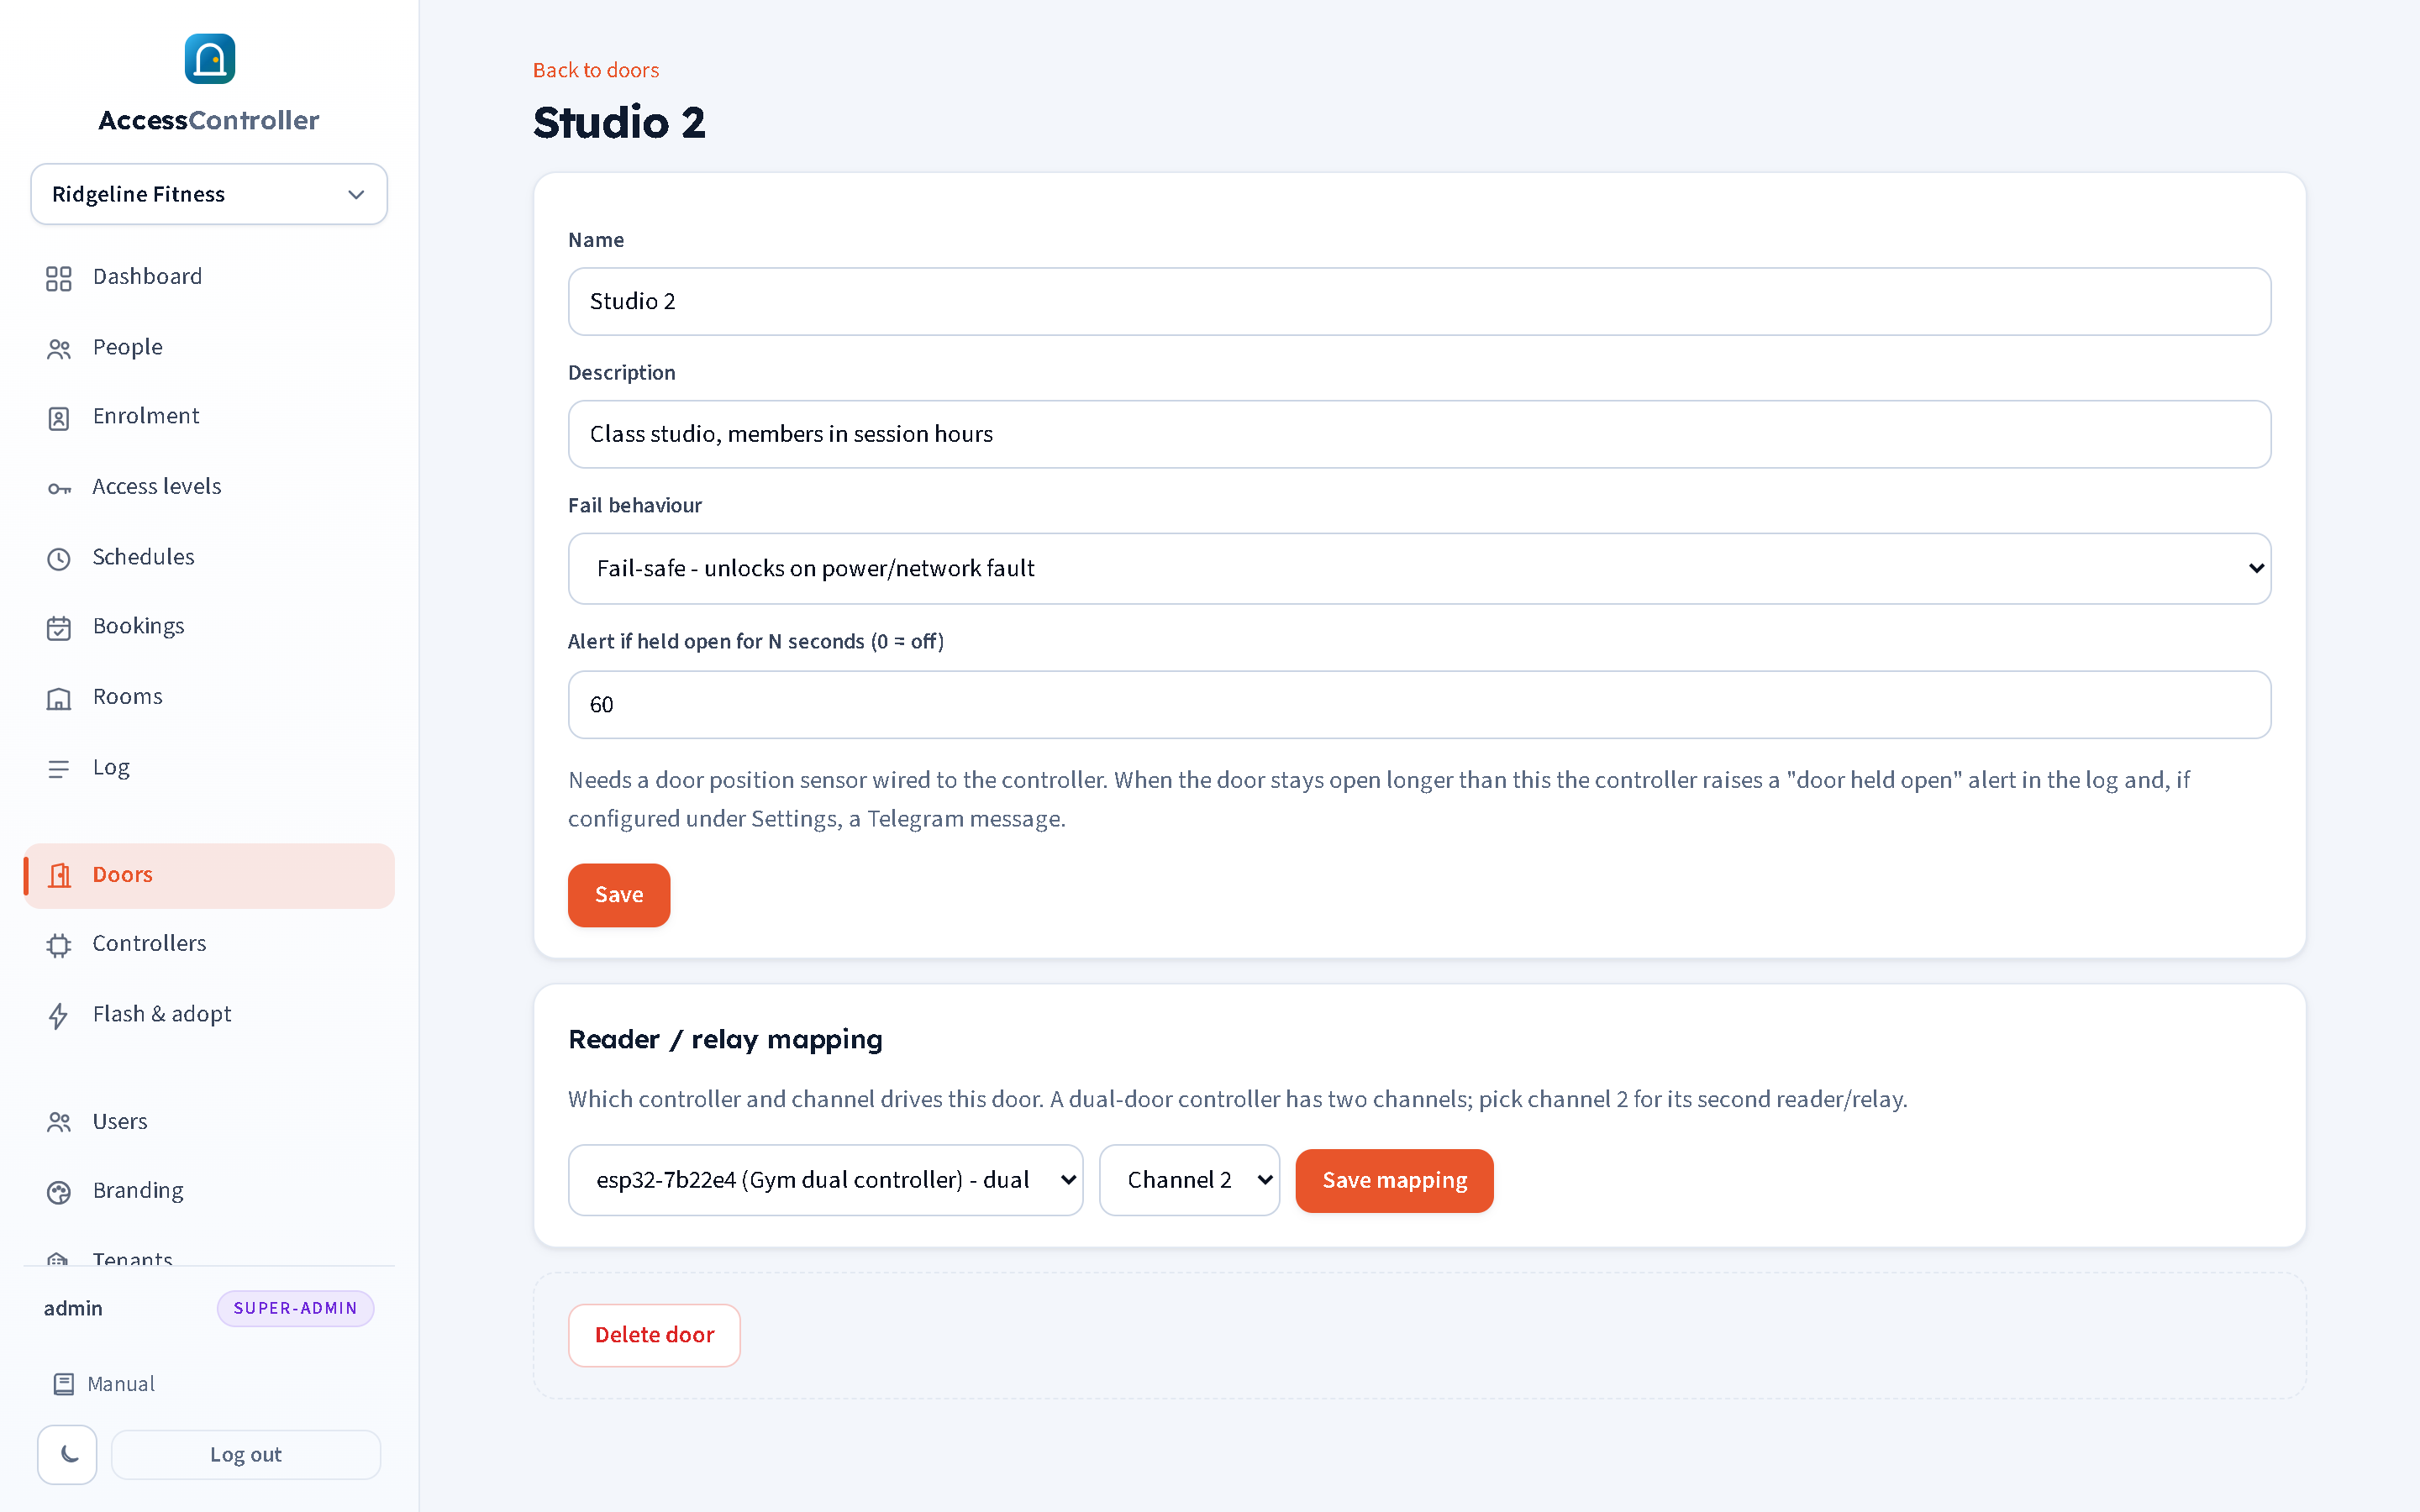
- Held-open time: how long the door may stay open before the controller raises a door held open alert. It is set per door on the door's detail page as Alert if held open for N seconds (0 = off). The default is 60 seconds;
0switches the held-open alert off for that door; the maximum is 3600. Press Save and the value is pushed to the door's controller within seconds inside the next keyset (it does not need re-provisioning), and the controller keeps it across power cuts. A door position sensor must be wired to the controller for this to work.
Note: the per-door held-open time is honoured by the current firmware. A controller running an older build ignores the value and keeps its compiled-in 60 seconds (or whatever
heldOpenMsan installer set in its pin map over USB). Press Update on the Controllers page (chapter 5) to bring it up to date. On a dual-door controller the current firmware watches the channel 1 door only, so the held-open time on a channel 2 door has no effect yet.
After a granted scan the controller also allows a grace window (the pulse length plus 10 seconds) in which the door may open without being reported as forced. Opening the door outside any grant, exit press or remote unlock raises a door forced alert. Both alerts go to the Log and, if it is set up, to Telegram (chapter 4).
Door open and close logging
When a door position sensor is fitted, the controller reports every change of the contact: the Log shows a Door opened line when the door opens and a Door closed line when it shuts, each stamped with the controller's own time. Exit-button presses are reported in the same way as Exit button. These are door events (chapter 11): they are neither grants nor denials, so they are not counted in the dashboard's scan and denied totals and do not appear on the reception screen, and the Log has its own Door open/close, exit button filter for them. Together with the access rows they show who opened the door, how long it stood open and whether it closed again.
The controller ignores contact changes that follow another within 200 milliseconds, so a rattling reed switch does not produce a burst of open/close lines. Without a sensor (door pin set to -1 in Settings) no open/close events are produced; without an exit button on the REX pin there are no exit-button events. Both need the current firmware.
Reader/relay mapping
The Reader / relay mapping panel on the door detail page says which controller and channel drives this door.
- Pick the controller from the list. Controllers are shown by their ID (for example
esp32-3f9a1c), their friendly name if set, and "- dual" if they are configured as dual-door. - Pick Channel 1 or Channel 2. Single-door controllers only use channel 1. On a dual-door controller, channel 1 is the first reader and relay and channel 2 is the second set (chapter 13 has the pin maps).
- Press Save mapping.
A door can be driven by only one channel. Mapping a door to channel 2 also marks that controller as dual-door. The same mapping can be made from the Controllers page (the Door drop-down there sets channel 1); the door page is where you set channel 2.
Choose "(none)" to unmap a door.
Editing and deleting a door
Change the name, description, fail behaviour or held-open alert time on the detail page and press Save. Renaming a door renames it everywhere, including in old log entries' door name where the name was stored at the time.
Delete door removes it. Access levels that referenced it lose that door, any controller mapped to it becomes unmapped, and if the door was a bookable room the room and its bookings go too (chapter 8). The log keeps the historic entries. You are asked to confirm.
Doors that are bookable rooms
Any door can be turned into a room: a residents' lounge, a shared gym, a laundry, a meeting room. Residents then reserve slots on the resident portal and the door opens for whoever has the slot. This is set up on the Rooms page and covered in chapter 8; nothing on the door's own page changes.
It is worth knowing at the wiring stage, because a room is the least demanding door on a site. It needs the lock relay and, ideally, a door position sensor, and it needs an exit button on the inside so that nobody is ever shut in. It does not need a fob reader: residents come in through the portal's "Open the door" button or by ringing the access line from the mobile they booked with. Fit a reader only if you also want people to fob in during their slot.
The reception screen link
At the top of the Doors page is the Reception screen panel: a link to a full-screen page for a laptop or wall monitor at the front desk that shows people's photos as they fob in. Copy copies the link, Open screen opens it in a new tab, and Regenerate replaces the secret token in the link so the old one stops working. Chapter 10 covers setting a screen up.