Chapter 06
People and fobs
People are the members, staff, residents and contractors who open doors. Each person can hold several fobs and one or more access levels. This chapter covers adding people, photos, finding people, managing fobs, the four ways of getting fob codes into the system, changing many people at once, the trash, importing from a spreadsheet or from an AC8000 backup, the check-a-fob tool and what "inactive" means.
Adding a person
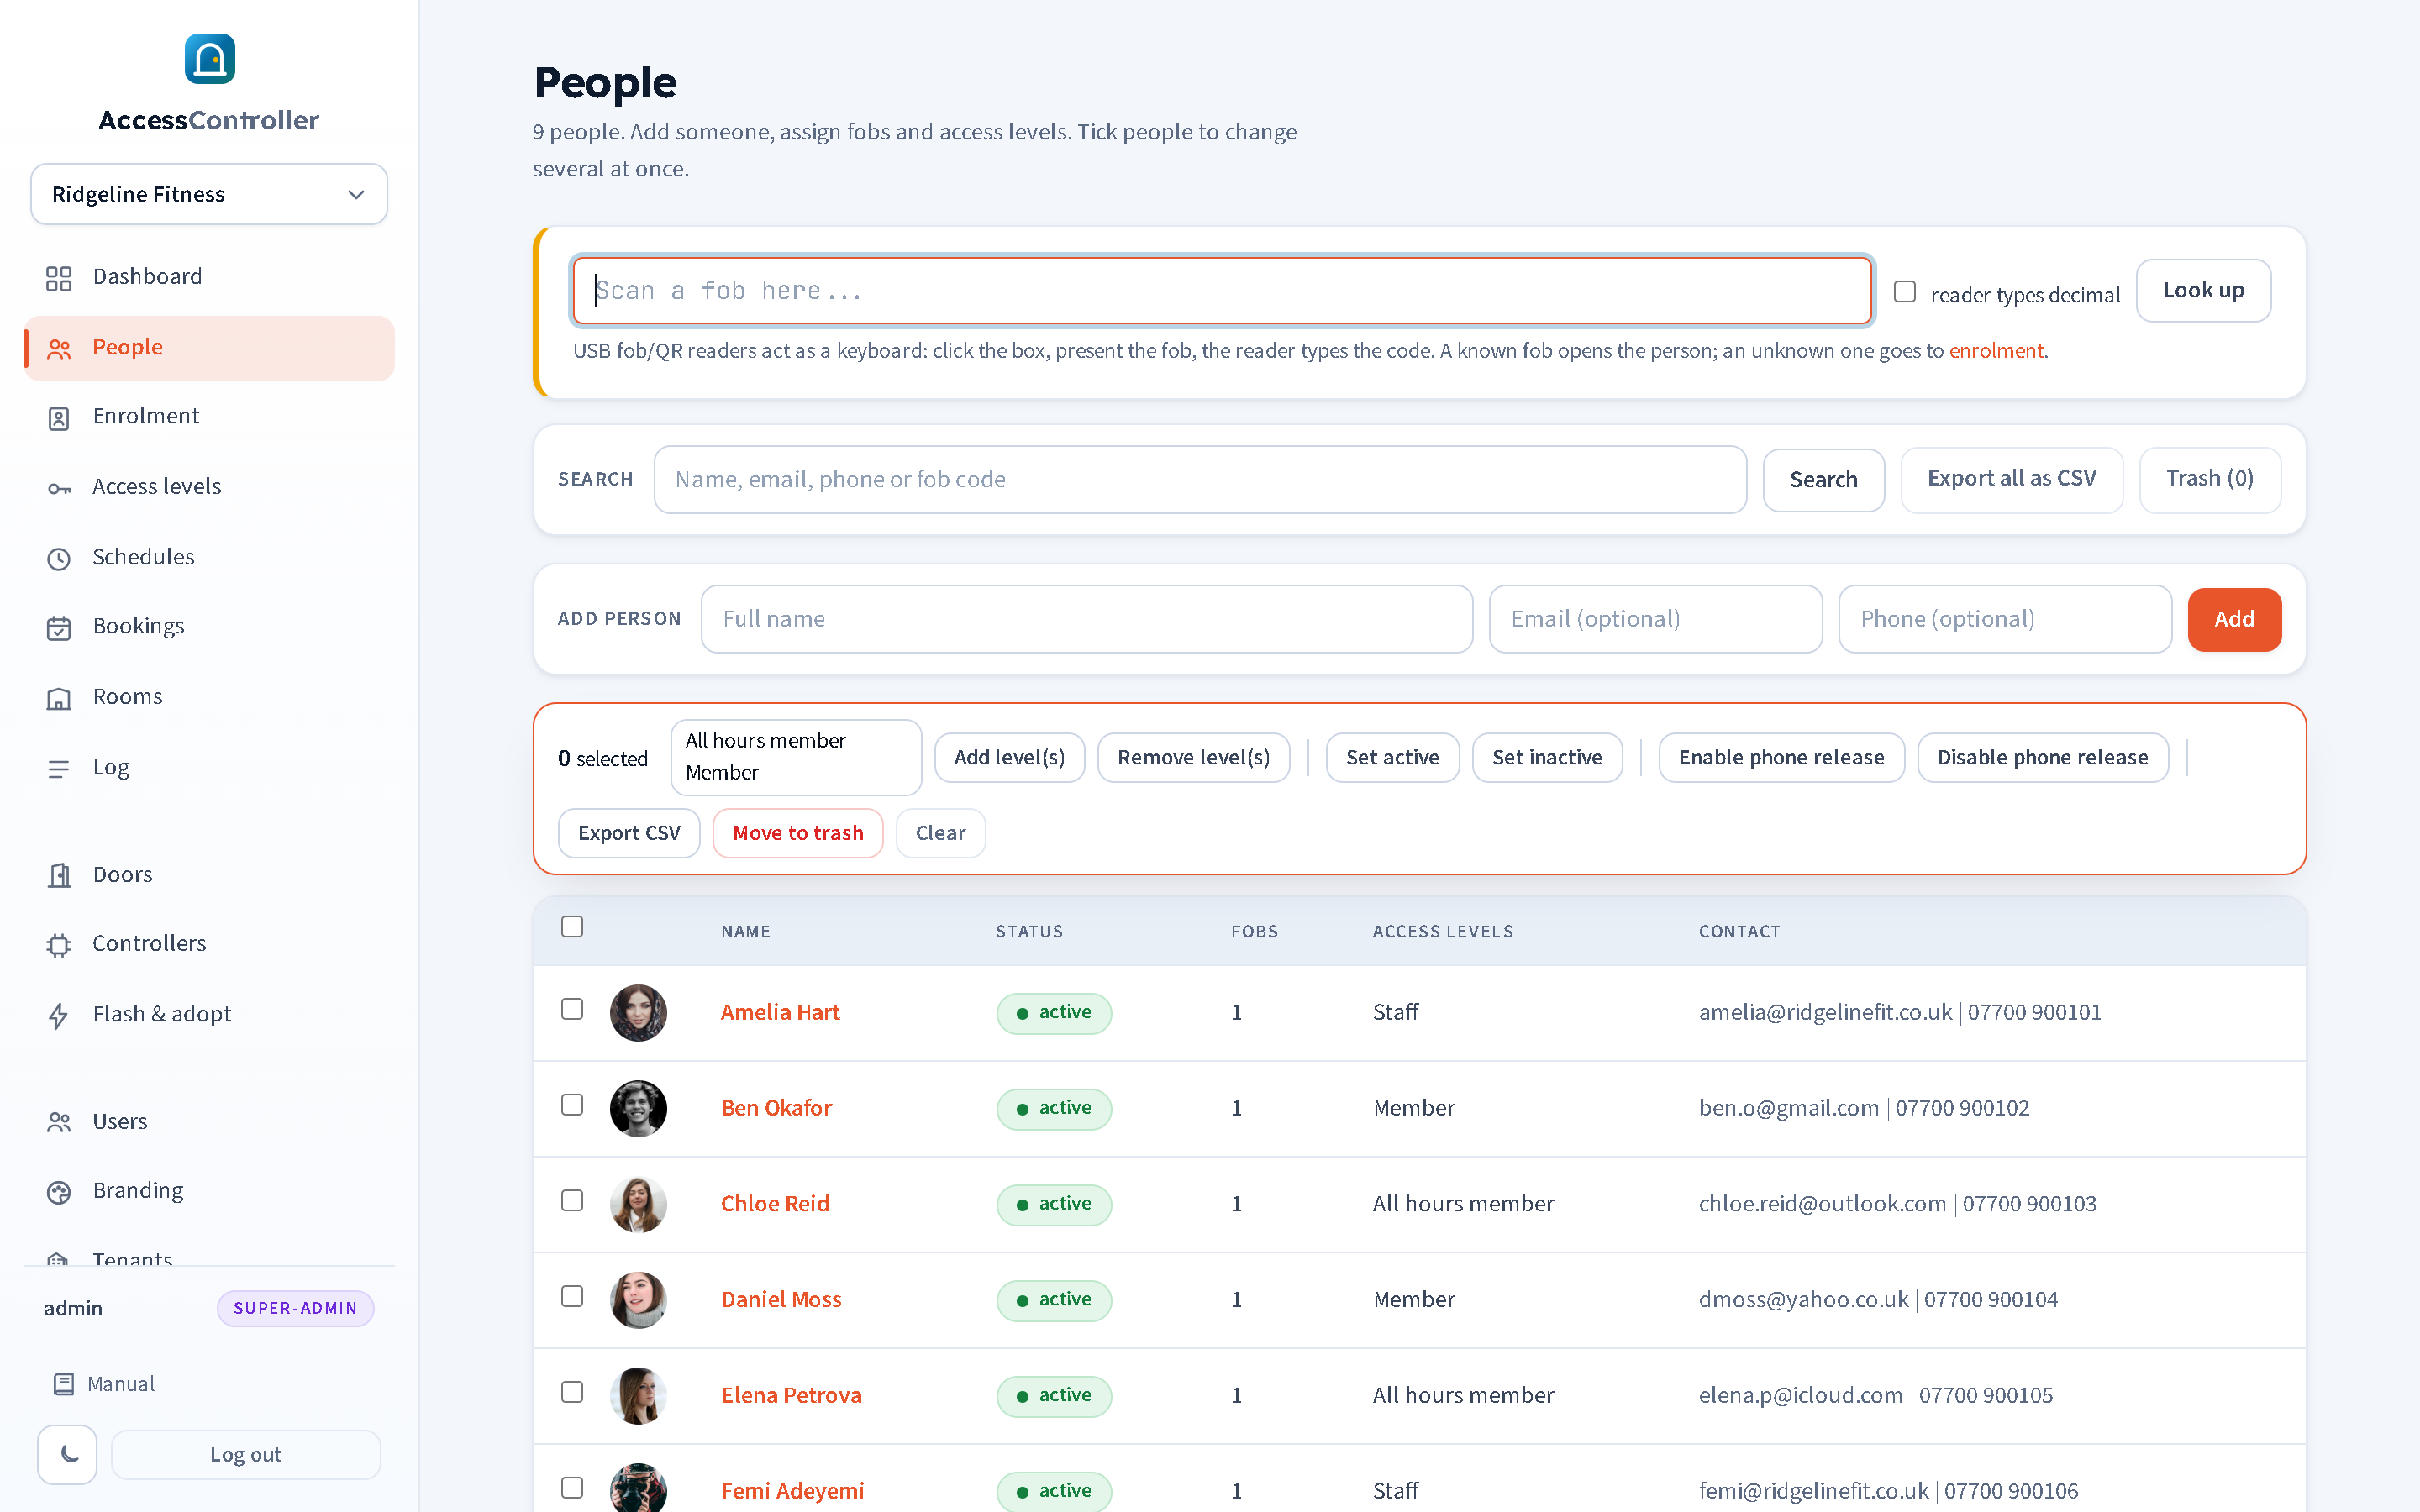
Open People. In the Add person toolbar type the full name and, optionally, an email address and phone number, then press Add. The person is created as active with no fobs and no access levels, and their page opens.
The phone number matters if the person will release doors by phone (chapter 9): the caller ID of their calls is matched against it, on the last nine digits, so 07911 123456, +44 7911 123456 and 447911123456 all match.
The person page
Details
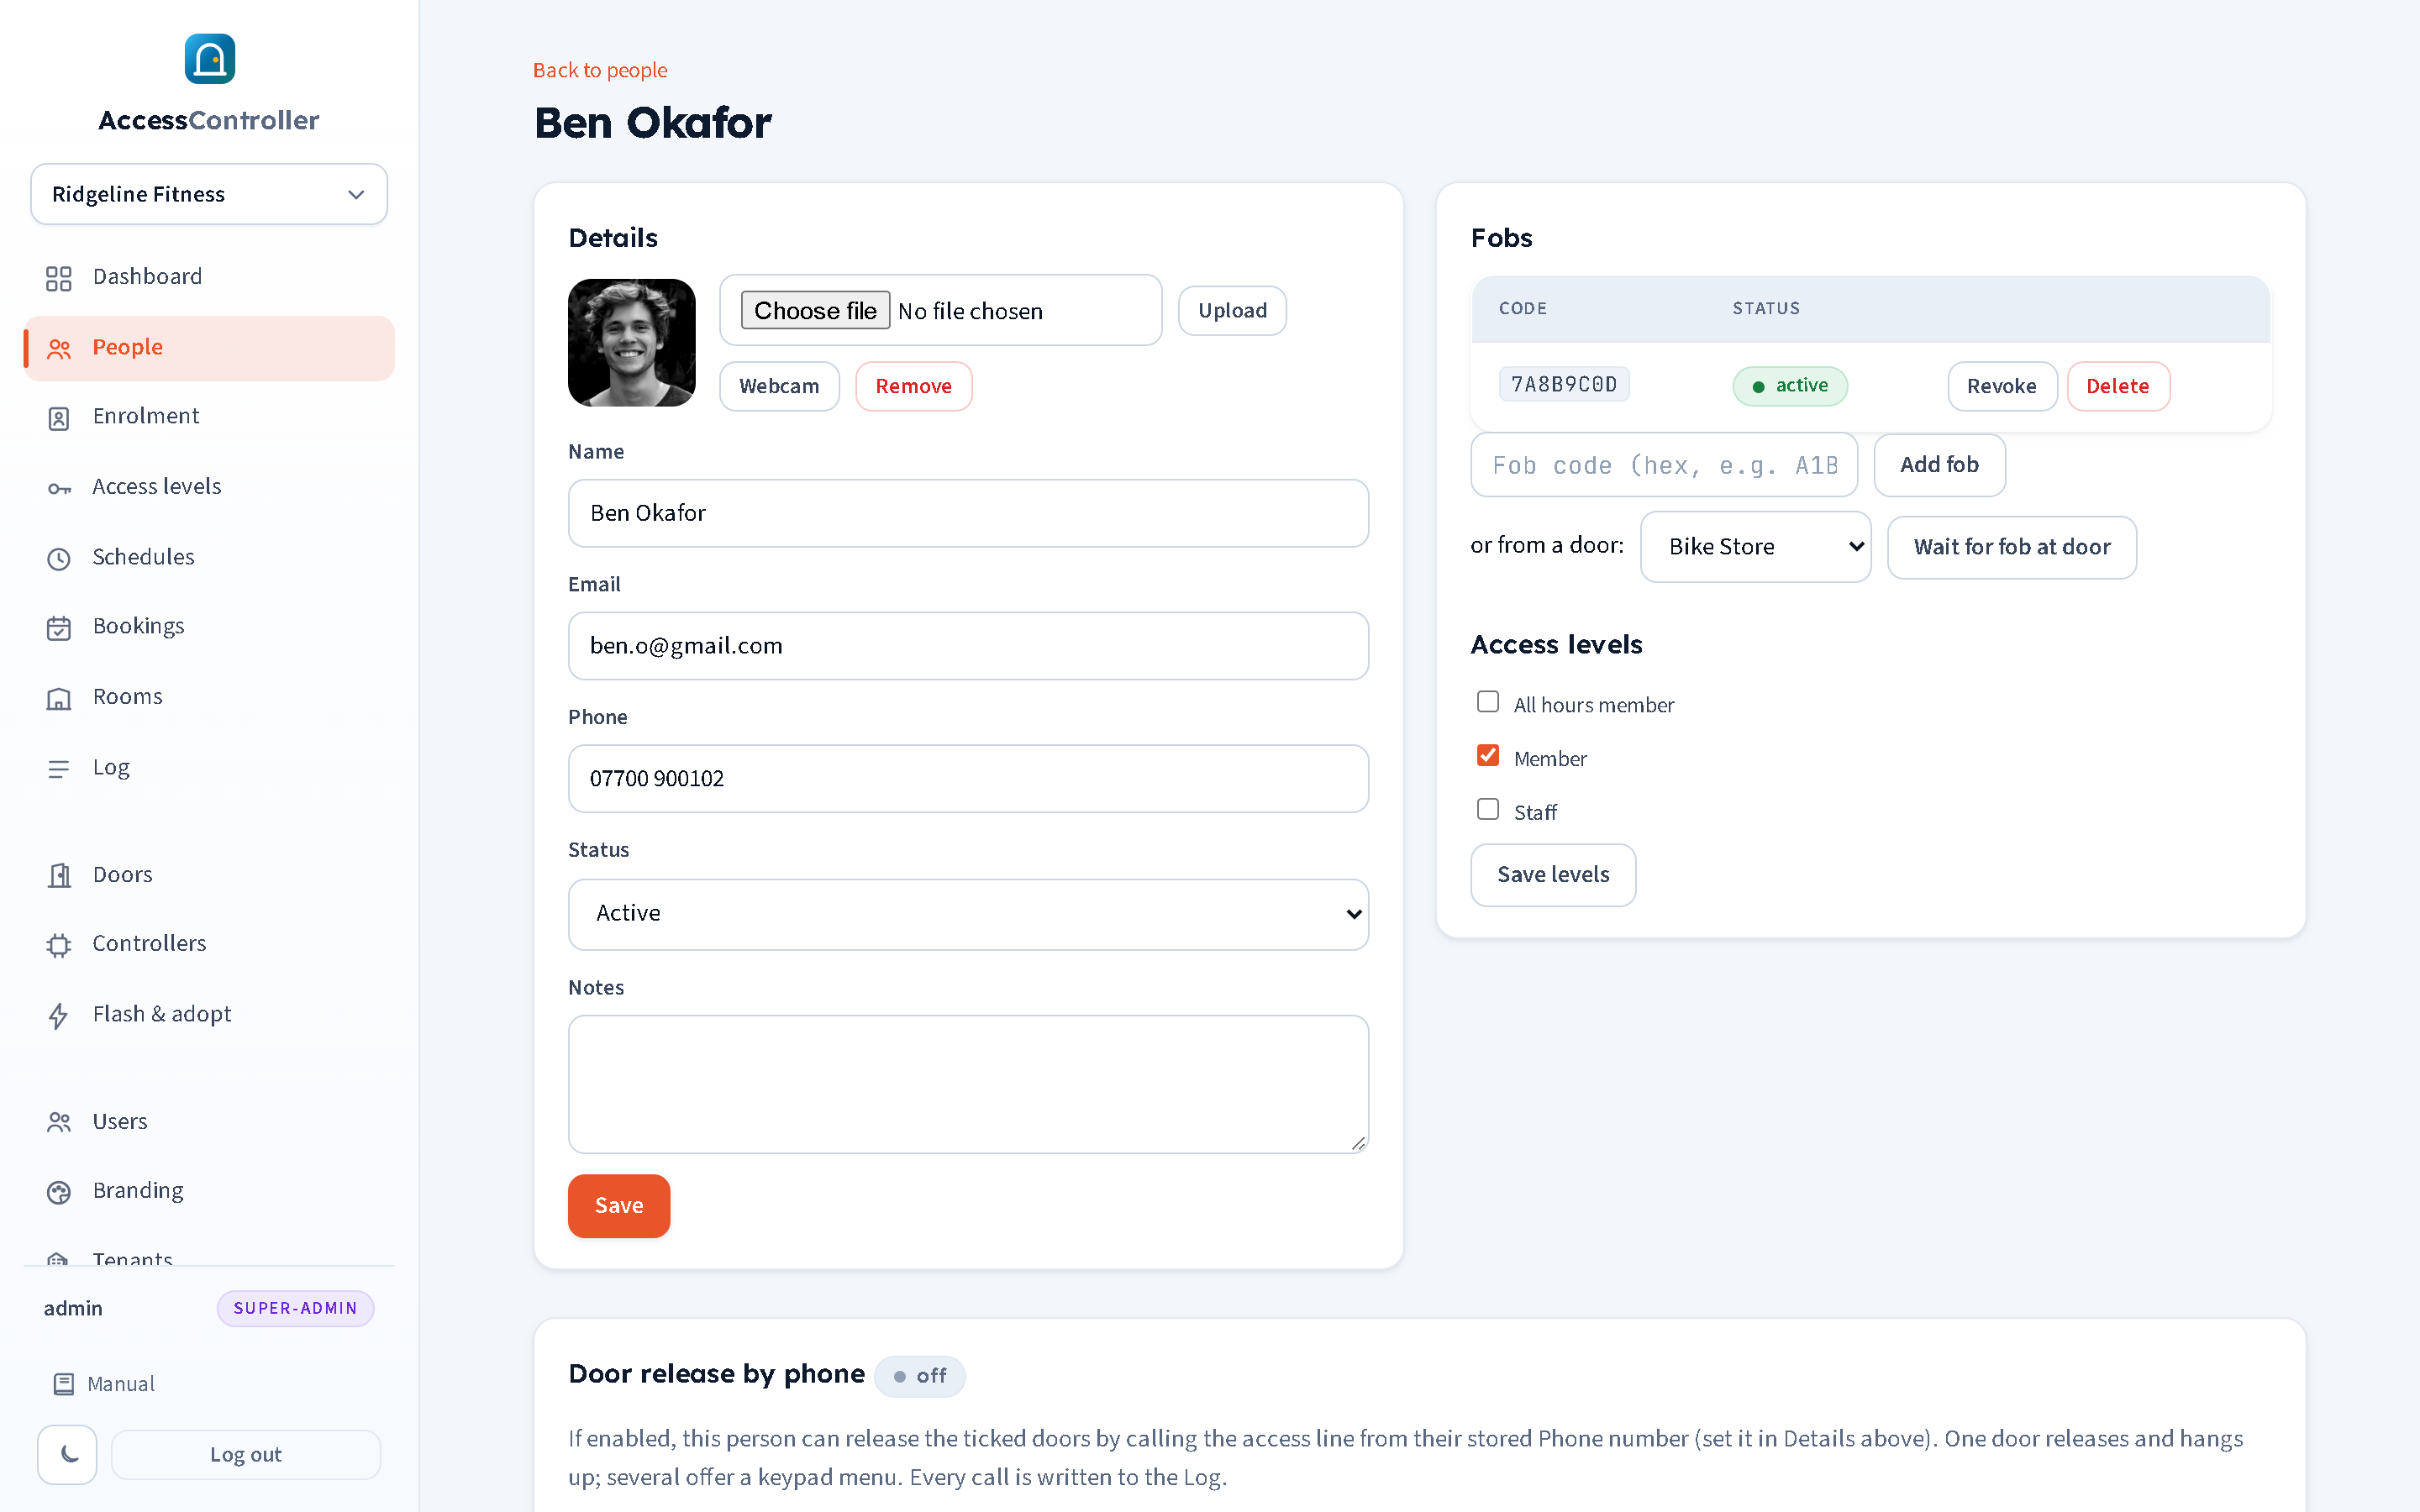
Name, email, phone, status (active or inactive) and free-text notes. Press Save after editing.
Photos
A photo is shown on the People list, on the person's page and, most usefully, on the reception screen the moment the person fobs in.
- Upload: choose an image file (JPEG, PNG, GIF or WebP, up to 4 MB) and press Upload.
- Webcam: press Webcam, allow the browser to use the camera, position the person and press Capture. The picture is cropped square and uploaded as a JPEG. Webcam capture needs a secure page (HTTPS or localhost), which hosted panels already are.
- Remove deletes the current photo. People without a photo are shown with their initials.
Fobs
The Fobs panel lists every fob on the person with its code and status.
- Add fob: type the code (hexadecimal, for example
A1B2C3; spaces, dashes and colons are ignored) and press Add fob. A code can belong to only one person within this tenant; the same code may exist independently in another tenant on the panel. - Revoke sets a fob to revoked. It stops working at every door within seconds (the doors get a new keyset). The fob stays on the person's page so you can see it was theirs.
- Re-activate returns a revoked fob to active.
- Delete removes the fob entirely (asks for confirmation).
- Wait for fob at door: pick a door and press the button; the panel listens at that door's reader for two minutes and attaches the next unknown fob presented there to this person. See "Enrolling a fob at a door" below.
A person's active fobs open doors according to their access levels; revoked fobs are refused with Fob revoked.
Access levels
Tick the levels the person should hold and press Save levels. A person with no levels is refused everywhere with No access level for door. Chapter 7 explains levels.
Door release by phone
Whether the person may release doors from their phone, which doors, and their apartment number and PIN for guests. Chapter 9.
Move to trash
At the bottom of the page. Move to trash takes the person out of service straight away: their fobs stop opening doors within seconds, they disappear from the People list, the keysets, phone release and the resident portal. Nothing is destroyed. They sit in the trash for 30 days, where they can be restored complete with their fobs and access levels, and are then removed automatically. See "The trash" below.
If the person may return sooner, or you only want to suspend them, set them inactive instead: that leaves them on the list and is a single click to undo.
Searching
The Search box on the People page matches name, email, phone or fob code (partial matches allowed). Press Search; Clear shows everyone again. The list shows a photo or initials, name, status, number of active fobs, access levels and contact details. Click a name to open the person.
Export all as CSV in the toolbar downloads everyone as a spreadsheet named people-<date>.csv, with the columns Name, Email, Phone, Status, Fobs, Access levels and Apartment. When a search is active the button becomes Export matches as CSV and exports only what the search found. People in the trash are never exported. Viewers may export as well as admins.
Changing several people at once
Every row on the People page has a tick box, and the box in the header ticks everyone. As soon as anything is ticked a bar appears showing N selected and the actions that can be applied to all of them:
| Action | What it does |
|---|---|
| Add level(s) | Adds the access levels chosen in the box beside the buttons to everyone ticked, keeping what they already hold. Ctrl-click to pick more than one level. |
| Remove level(s) | Takes those levels away from everyone ticked. |
| Set active / Set inactive | Changes the status of everyone ticked. |
| Enable phone release / Disable phone release | Turns caller-ID release on or off for everyone ticked (chapter 9). It does not change which doors they may release. |
| Export CSV | Downloads just the ticked people as a spreadsheet. |
| Move to trash | Moves everyone ticked to the trash, after a confirmation that names the number of people. |
| Clear | Unticks everything. It changes nothing. |
The message afterwards counts the people actually changed, so Set active applied to a mixed selection reports only the ones that were inactive. Keysets are re-pushed once at the end. The search is kept, so you can search "Smith", tick all, add a level, and carry on.
This is the quickest way to run a membership change: search for the group, tick, add or remove the level.
The trash
The Trash button in the People page toolbar shows how many people are in it, for example Trash (3). (The same page is linked from the hint under a person's delete button.) It lists everyone who has been deleted and not yet purged.
| Column | Meaning |
|---|---|
| Name | The person, with their email underneath. |
| Fobs | How many fobs went with them. They are kept but inert. |
| Deleted on | When they were moved to the trash. |
| Removed in | How many days are left of the 30. next purge means they are due to go at the next sweep. |
- Restore puts the person back exactly as they were: same fobs, same access levels, same phone-release doors. Their doors work again within seconds. It opens their page.
- Delete permanently removes them and everything attached to them now, after a confirmation. This cannot be undone.
The automatic sweep runs when the panel starts and every six hours after that, so someone may sit in the trash a few hours past their 30 days before disappearing. Each sweep writes one line to the Log per tenant (Trash purged), and moving to the trash, restoring and deleting permanently are each logged too (chapter 11).
The trash is what makes deleting a person safe: the usual "did we just delete the wrong Smith?" is a click to undo. Log entries are never deleted by any of this; they keep the name recorded at the time.
Getting fob codes into the system
There are four ways to attach a fob code, from the quickest for a single fob to the best for a whole site.
1. Type it
If the code is printed on the fob or known from the old system, type it into Add fob on the person's page. Codes are uppercase hexadecimal. Old systems often show the same fob as a decimal "card number"; use the desk scan box or the CSV import with the decimal option to convert.
2. Scan it at the desk
A USB fob or card reader that acts as a keyboard (a "keyboard wedge" reader) can be plugged into the office computer. On the People page, click into the Scan a fob here box, present the fob, and the reader types the code and presses Enter for you. Tick reader types decimal if your reader outputs decimal numbers rather than hexadecimal.
- A known fob opens that person's page (the message says whose it is).
- An unknown fob is sent to the Enrolment page with an assignment form ready, marked "desk".
This is also the fastest way to answer "whose fob is this?" for a fob found on the floor.
3. Enrol it at a door
You do not need a desk reader; any door reader will do.
- From the person's page: choose a door under "or from a door" and press Wait for fob at door. The page shows "Listening at (door) until (time)". Present the new fob at that door's reader within two minutes. The panel captures the code, attaches it to the person, pushes the new keyset and logs Fob enrolled at door. The page refreshes itself when it happens. Stop listening cancels.
- From the Enrolment page: choose a door and a listening time (2, 5 or 15 minutes) and press Wait for a fob at this door. The next unknown fob at that reader is captured into the list below and the page jumps to an assignment form for it.
While a door is listening, the fob presented does not open the door (it is still unknown at that moment) and the scan is logged as Captured for enrolment rather than as a denial, so it does not count towards "denied today". Only one door listens at a time per tenant.
4. Enrolment mode (a batch of fobs at chosen doors)
Enrolment mode is the migration path from a standalone system (Paxton Net2 without an export, an AC8000 whose backup has been lost, and similar) where nobody knows the codes. If you still have the old system's export or backup, use the import wizard instead ("Importing from a legacy system" below). Switch it on at the doors people will badge and every unknown fob presented there is accepted (the door opens) and captured, so members keep coming in as normal while the panel harvests their fobs. Then assign names to the captured codes.
Enrolment mode is started on the Enrolment page, not in Settings. In the Enrolment mode panel:
- Tick the doors people will badge. Only those doors accept and capture unknown fobs; every other door on the site is unaffected and keeps refusing them. The doors you used last time are already ticked, so re-arming is one click.
- Choose the default access level the people you enrol should end up with, for example Access level: Members. Choose Access level: none to decide later.
- Choose how long: for 15 minutes, for 30 minutes (the default), for 60 minutes or for 120 minutes.
- Press Start enrolment.
A banner then appears at the top of every page for the tenant reading, for example:
Enrolment mode on at Front, Gym until 14:35 (level: Members) - 3 captured to assign
with a Stop button. The Enrolment page's own panel turns green and shows the same information with Stop enrolment now. The Settings page also shows a green Enrolment mode panel while it is running, with a stop button, but starting is only ever done from the Enrolment page.
Enrolment ends automatically at the time shown, or when you press Stop. Stopping flashes Enrolment stopped - unknown fobs are denied again and keeps your door ticks and level choice ready for next time. Starting and stopping are logged as system events (Enrolment started, Enrolment stopped), and scans accepted this way are logged as granted with the reason Enrolment (auto-accepted).
Warning: at the doors you ticked, any fob of the right format opens the door while enrolment mode is on, including fobs from other buildings and fobs that were revoked on the old system. That is the point of it, but it means you should tick only the doors you are actually standing at, keep the window as short as the job allows, and switch it off as soon as you are done. Picking doors is what limits the exposure: the front entrance can be in enrolment mode while the plant room is not.
The Enrolment page
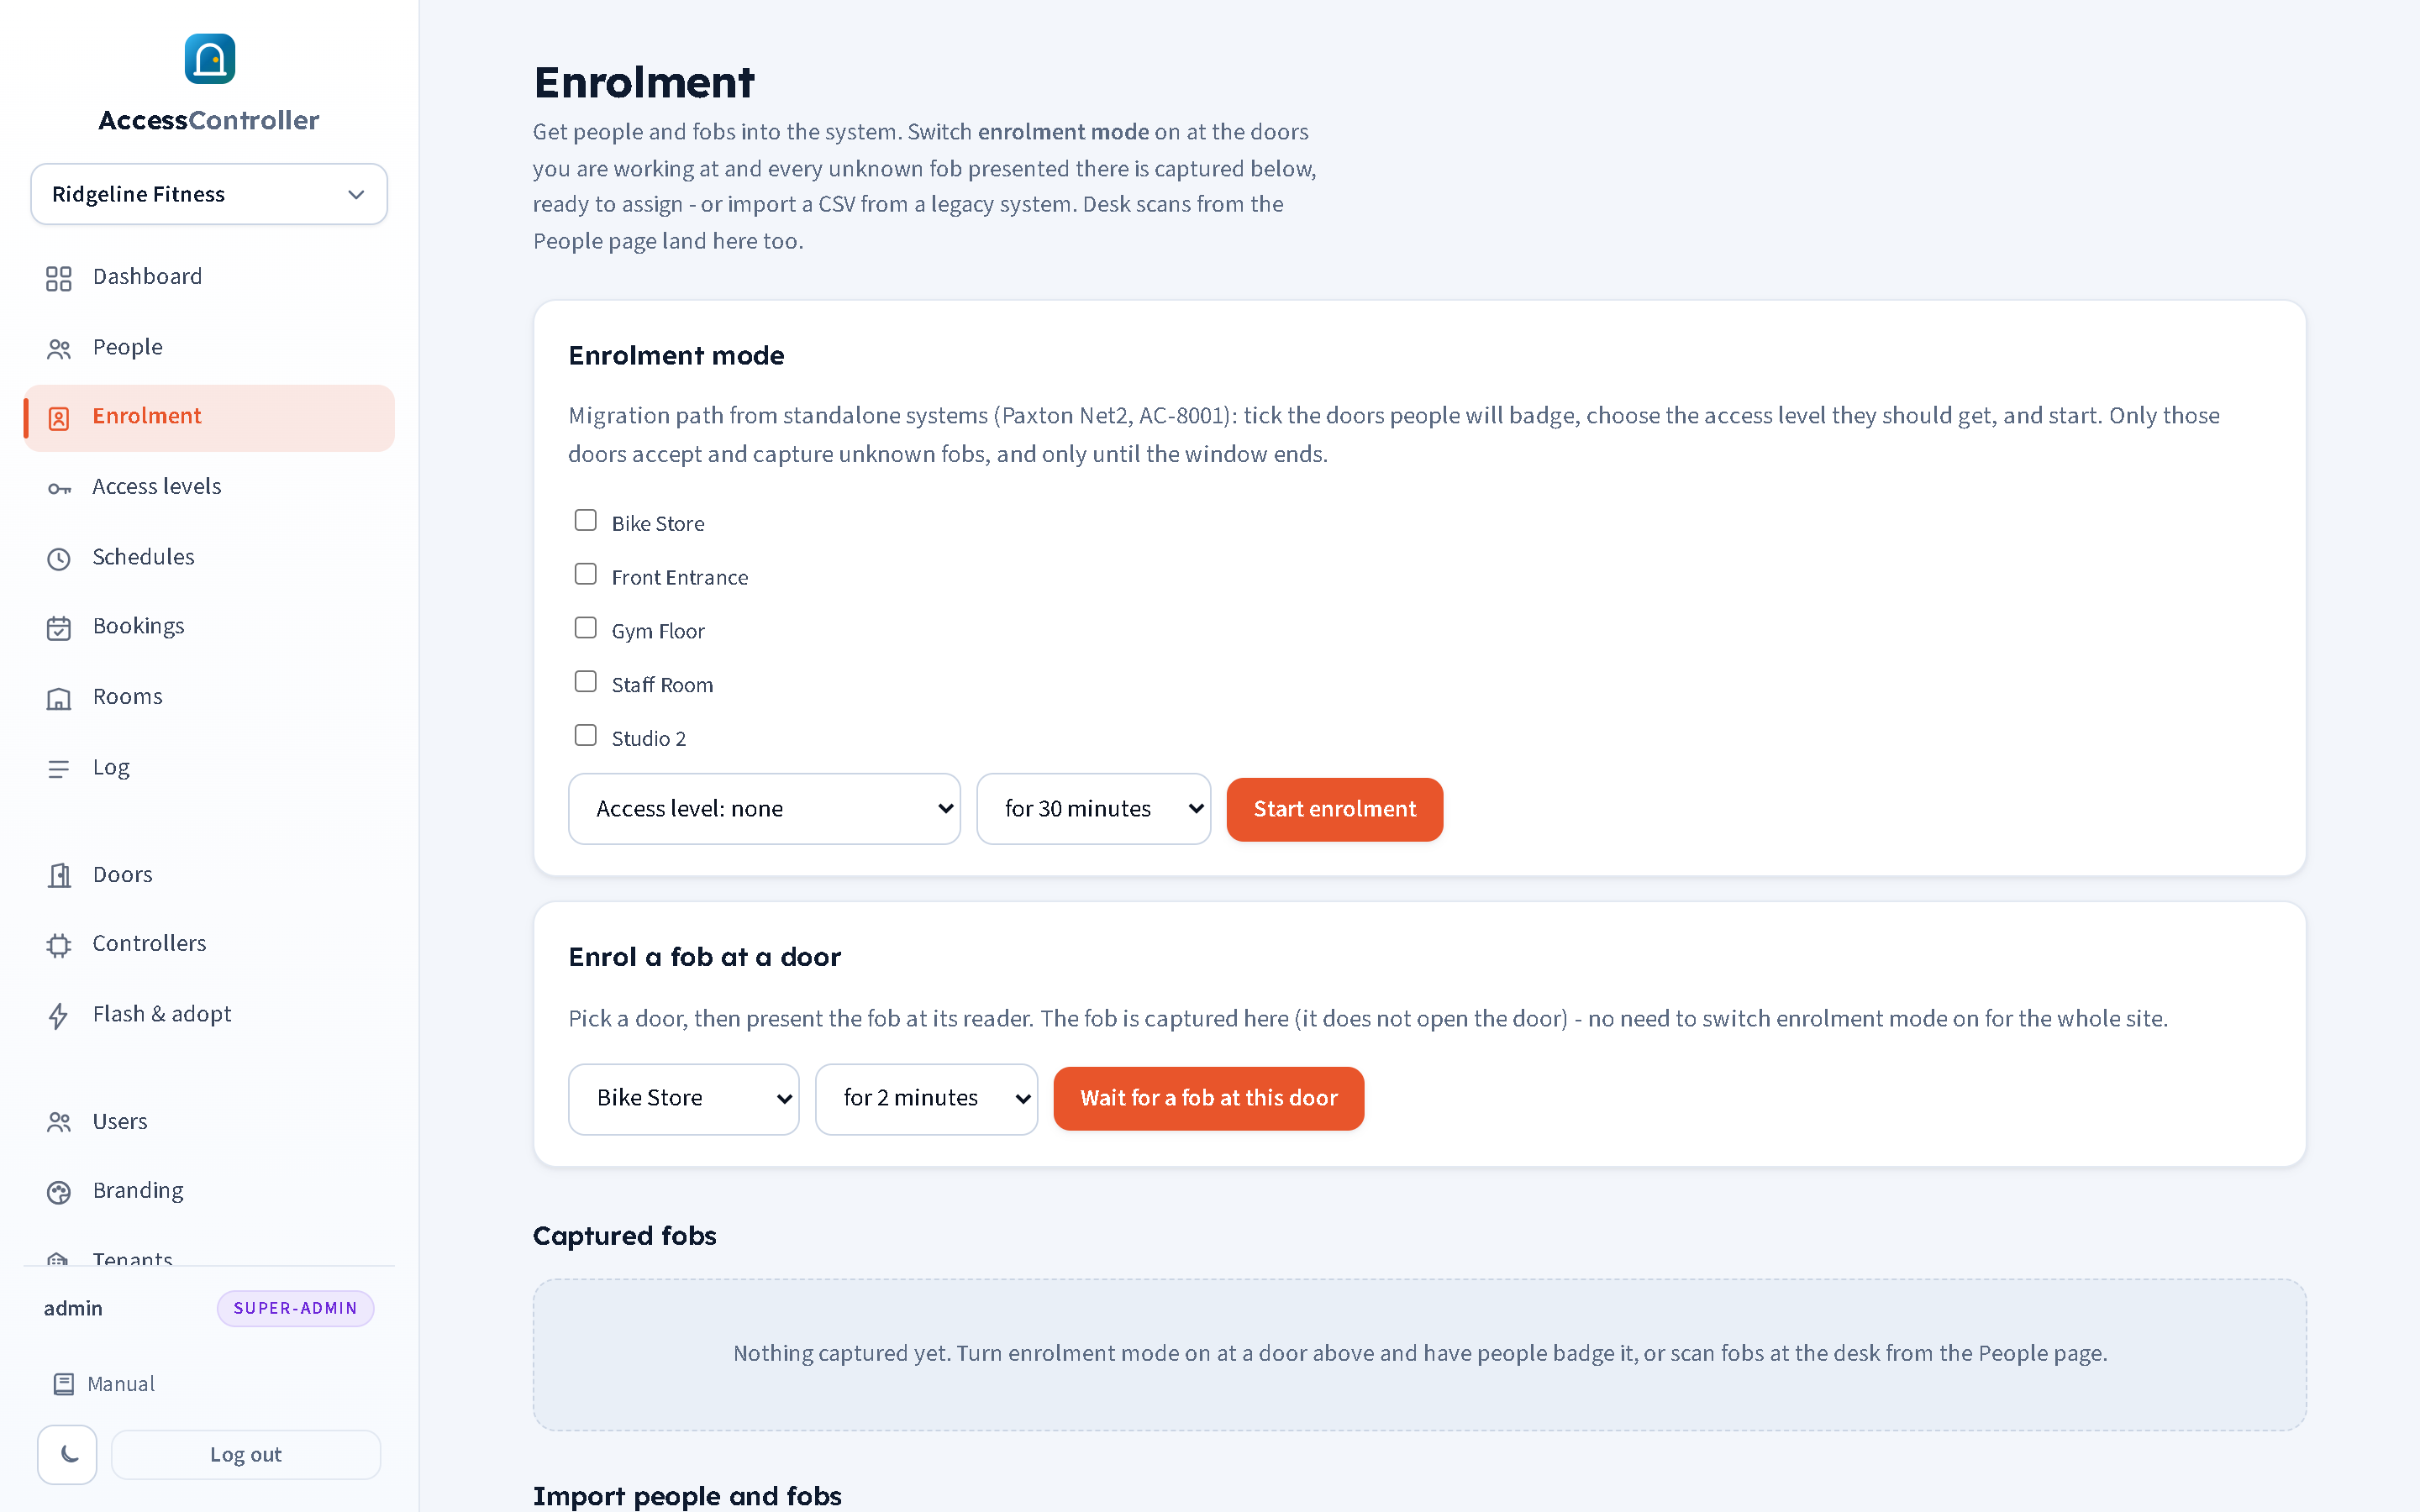
Captured fobs lists every code captured by enrolment mode, by listening at a door, by phone enrolment or by an unknown desk scan. The count is shown beside the heading.
| Column | Meaning |
|---|---|
| Fob | The code, in hexadecimal. |
| Seen | How many times that fob has been presented. Re-presenting a fob bumps this rather than adding a second row. |
| Last seen | When it was last presented. |
| Where | The door it was last presented at. A fob that came from the office reader is marked desk. |
| Assign to | The controls to give it to somebody. |
To assign a fob: choose an existing person, or leave - new person - selected and type a name; choose an access level (the enrolment level is already selected); press Assign.
The access level is applied the same way whether the fob went to a new person or an existing one, and it is added to whatever the person already holds. Assigning a fob therefore never takes access away: enrol a long-standing member at the front door and they keep everything they had plus the enrolment level.
Dismiss drops a captured code you do not want (a visitor's fob, a fob from another site). Captured fobs stay in the list until they are assigned, dismissed or matched by an import; nothing expires them. The dashboard shows an amber "captured fobs waiting to be assigned" banner while the list is not empty.
Tip: the whole point of the default access level is that you never have to come back. Tick the doors, set the level to what a new member gets, and every fob you assign during the window arrives fully set up.
Importing from a legacy system
If the old system can give you its data, bring people and fobs across in one go from the Import people and fobs section of the Enrolment page. Two sources are supported; pick one with the two large buttons at the top of the section:
- CSV / spreadsheet export: a user export from Paxton Net2, or any CSV with a name column and a card-number column.
- AC8000 / iCCard3000 backup (.mdb): the database backup made by the AC8000 PC software. This brings across people, fob codes, door names and, optionally, the swipe history.
Whichever source you use, nothing is written to the panel until you press Run import on the preview page, and a fob that already exists is never overwritten.
Import from CSV
- Export users to CSV from the old software.
- Choose CSV / spreadsheet export, then either choose the file or paste its contents into the box, and press Preview import.
- On the preview page, check the detected columns: First name, Surname (or a single Full-name column when there is no first/surname split) and the Token / fob column. Correct any guess with the drop-downs.
- Leave Tokens are decimal card numbers ticked for Net2 and most systems that show card numbers in decimal; untick it if the column already holds hexadecimal codes.
- Optionally tick the access levels to give everyone imported (see "The preview page" below).
- Check the sample rows (the first 12, with any per-row problem flagged) and press Run import.
Format rules:
- The file may be comma, semicolon or tab separated; the delimiter is detected.
- The first row is treated as headers. Column names are matched case-insensitively: token columns are recognised by "token", "card number", "card no", "fob", "credential" or "badge"; first names by "first name", "forename" or "given"; surnames by "surname", "last name" or "family"; a whole name by "full name", "user name" or "name".
- Tokens may contain spaces, dashes, colons or dots; these are stripped. Decimal tokens are converted to hexadecimal. The result must be 2 to 16 hexadecimal digits.
- Rows with an empty name or an invalid token are counted as failed and skipped.
- A fob that already exists in the tenant is skipped, never overwritten; its row does not create a duplicate person.
- Up to 4 MB per upload.
A minimal file looks like this:
First name,Surname,Token number
Alice,Example,12345678
Bob,Sample,12345679
Import from an AC8000 / iCCard3000 backup
Sites running the AC8000 family of standalone controllers (the PC software is called iCCard3000 or AC8000 depending on the version) usually have no export function, but the software keeps its whole database in a Microsoft Access file and can back it up. That backup contains everything the wizard needs: the people and their card numbers, the readers and doors, and every swipe the system recorded.
Where the backup comes from. In the AC8000 PC software use its backup (or database backup) function; it writes a file with an .mdb extension, typically named after the software and the date, for example iCCard3000-2026-09-07_135352_92.mdb. Copy that file to the computer you use for the panel. If you cannot find a backup, the live database the software uses is the same kind of file and can be copied while the software is closed.
The steps:
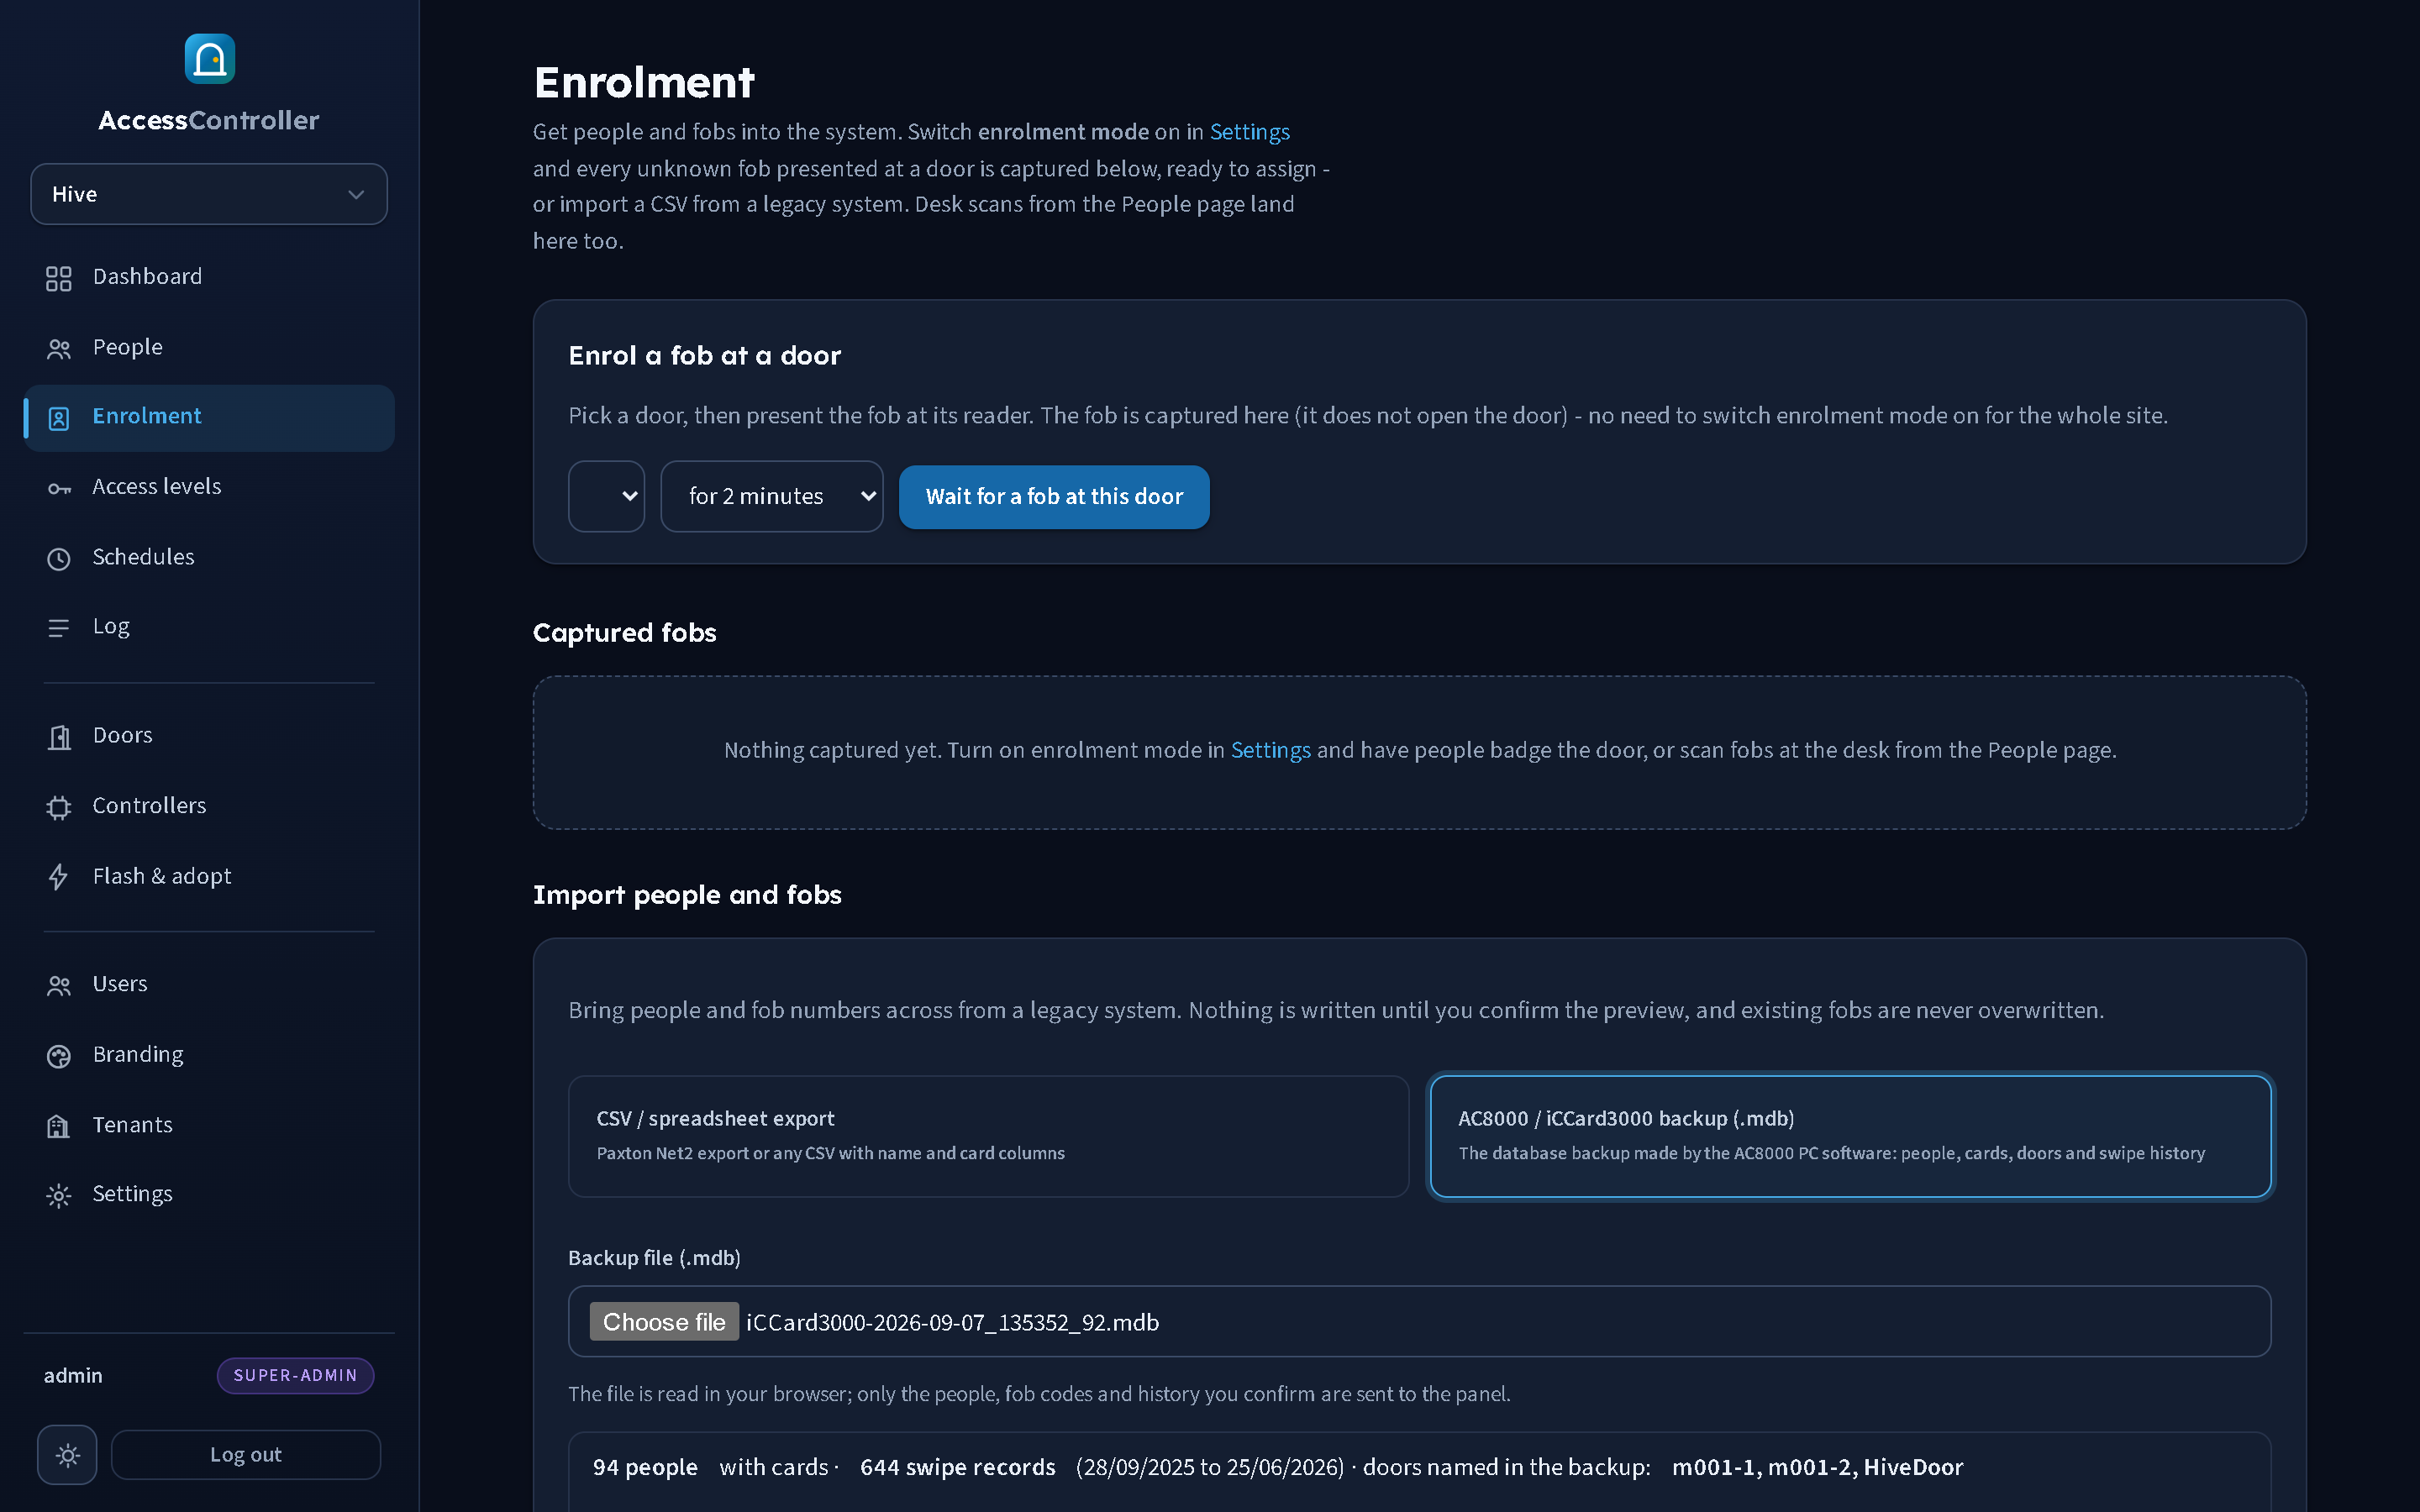
- Open Enrolment, scroll to Import people and fobs and choose AC8000 / iCCard3000 backup (.mdb).
- Under Backup file (.mdb) choose the file. It is read in your browser, not uploaded: only the people, fob codes and history you go on to confirm are sent to the panel. After a moment a summary appears: how many people with cards were found, how many swipe records and the dates they span, and the door names found in the backup. If any people had a keypad PIN in the old system, the summary says so and reminds you that PINs are not imported.
- Choose the Reader format at your doors: Wiegand 34 (8 hex digits) or Wiegand 26 (6 hex digits). This decides how the decimal card numbers in the backup are written as fob codes, and it should match what the readers on the new controllers send. If the backup contains a card number above 16,777,215 (the largest value a 26-bit reader can send) the wizard knows the site's readers must be 34-bit and sets 8 digits for you, with a note in the summary. Otherwise the default is 8 digits; change it to 6 if your readers are Wiegand 26.
- Leave Include the swipe history ticked to bring the old log across, or untick it to import people and fobs only.
- Leave Rows with the same name are one person with several fobs ticked unless you want every card to become its own person. See "One person, several fobs" below.
- Press Continue to preview.
What is read from the backup:
- People and their names. Every record that has a card. A record with no name is imported as "Unnamed".
- Card numbers, converted from the decimal number the AC8000 shows to a hexadecimal fob code of the chosen width, padded with leading zeros (decimal
20002473becomes013136A9at 8 digits). - Door names, worked out from the reader names. The AC8000 names readers per side of the door, such as
HiveDoor-InandHiveDoor-Exit; the wizard strips the-In,-Outor-Exitsuffix and treats what is left as the door. Only readers that appear in the history or in an access rule are counted, so the placeholder readers the AC8000 lists for unused door slots are ignored. - Swipe history: every swipe record with its time, card, reader and whether the old system granted or denied it. The most recent 20,000 records are kept if there are more.
What is not imported:
- Keypad PINs. The panel's PINs are per-apartment for phone access (chapter 9) and are set on each person afterwards if needed.
- Access rules and schedules from the old system. Give access with the tick list on the preview page instead.
Status, valid-to dates and notes
The wizard carries across three things beyond the name and the card, and they are worth understanding because they decide who arrives switched off:
- Status. The AC8000's per-person "Access Control" flag becomes the panel's active/inactive status. Somebody whose access was turned off in the old system arrives inactive on the panel, so a lapsed or barred member does not silently regain access on the day you cut over.
- Valid to. The old system's end date. A valid-to date that has already passed also imports the person as inactive, for the same reason. The AC8000 uses a date in 2099 to mean "no expiry"; the wizard recognises that and ignores it.
- Notes. Each person's notes receive their AC8000 record number, for example
AC8000 record 0042, and the valid-to date where one is set. That record number is the thread back to the old system if you ever have to check something, so keep it.
Everyone else arrives active. Review the inactive people after the import: some will be genuine leavers to move to the trash, others will be members whose renewal never got recorded in the old software.
One person, several fobs
Standalone systems commonly hold one record per card, so a member who was issued a replacement fob appears twice with the same name. The wizard's Rows with the same name are one person with several fobs option, which is on by default, collapses those into a single person holding both fobs. It is the behaviour you almost always want: one person on the People page, both cards working, one set of access levels.
Untick it (in the wizard, or on the preview page) if the duplicate names are genuinely different people. Each card then becomes its own person, and the AC8000 record number is appended to the name to tell them apart, for example "J Smith 0042" and "J Smith 0117". Rename them afterwards.
The same fob at more than one site
A fob code is unique within a tenant, not across the panel. The same backup can therefore be imported into a second tenant (a test tenant, or a second building of the same operator) and the cards attach there too, independently. A resident who holds one fob for two buildings you manage is a person in each tenant, and revoking them in one has no effect on the other.
The preview page
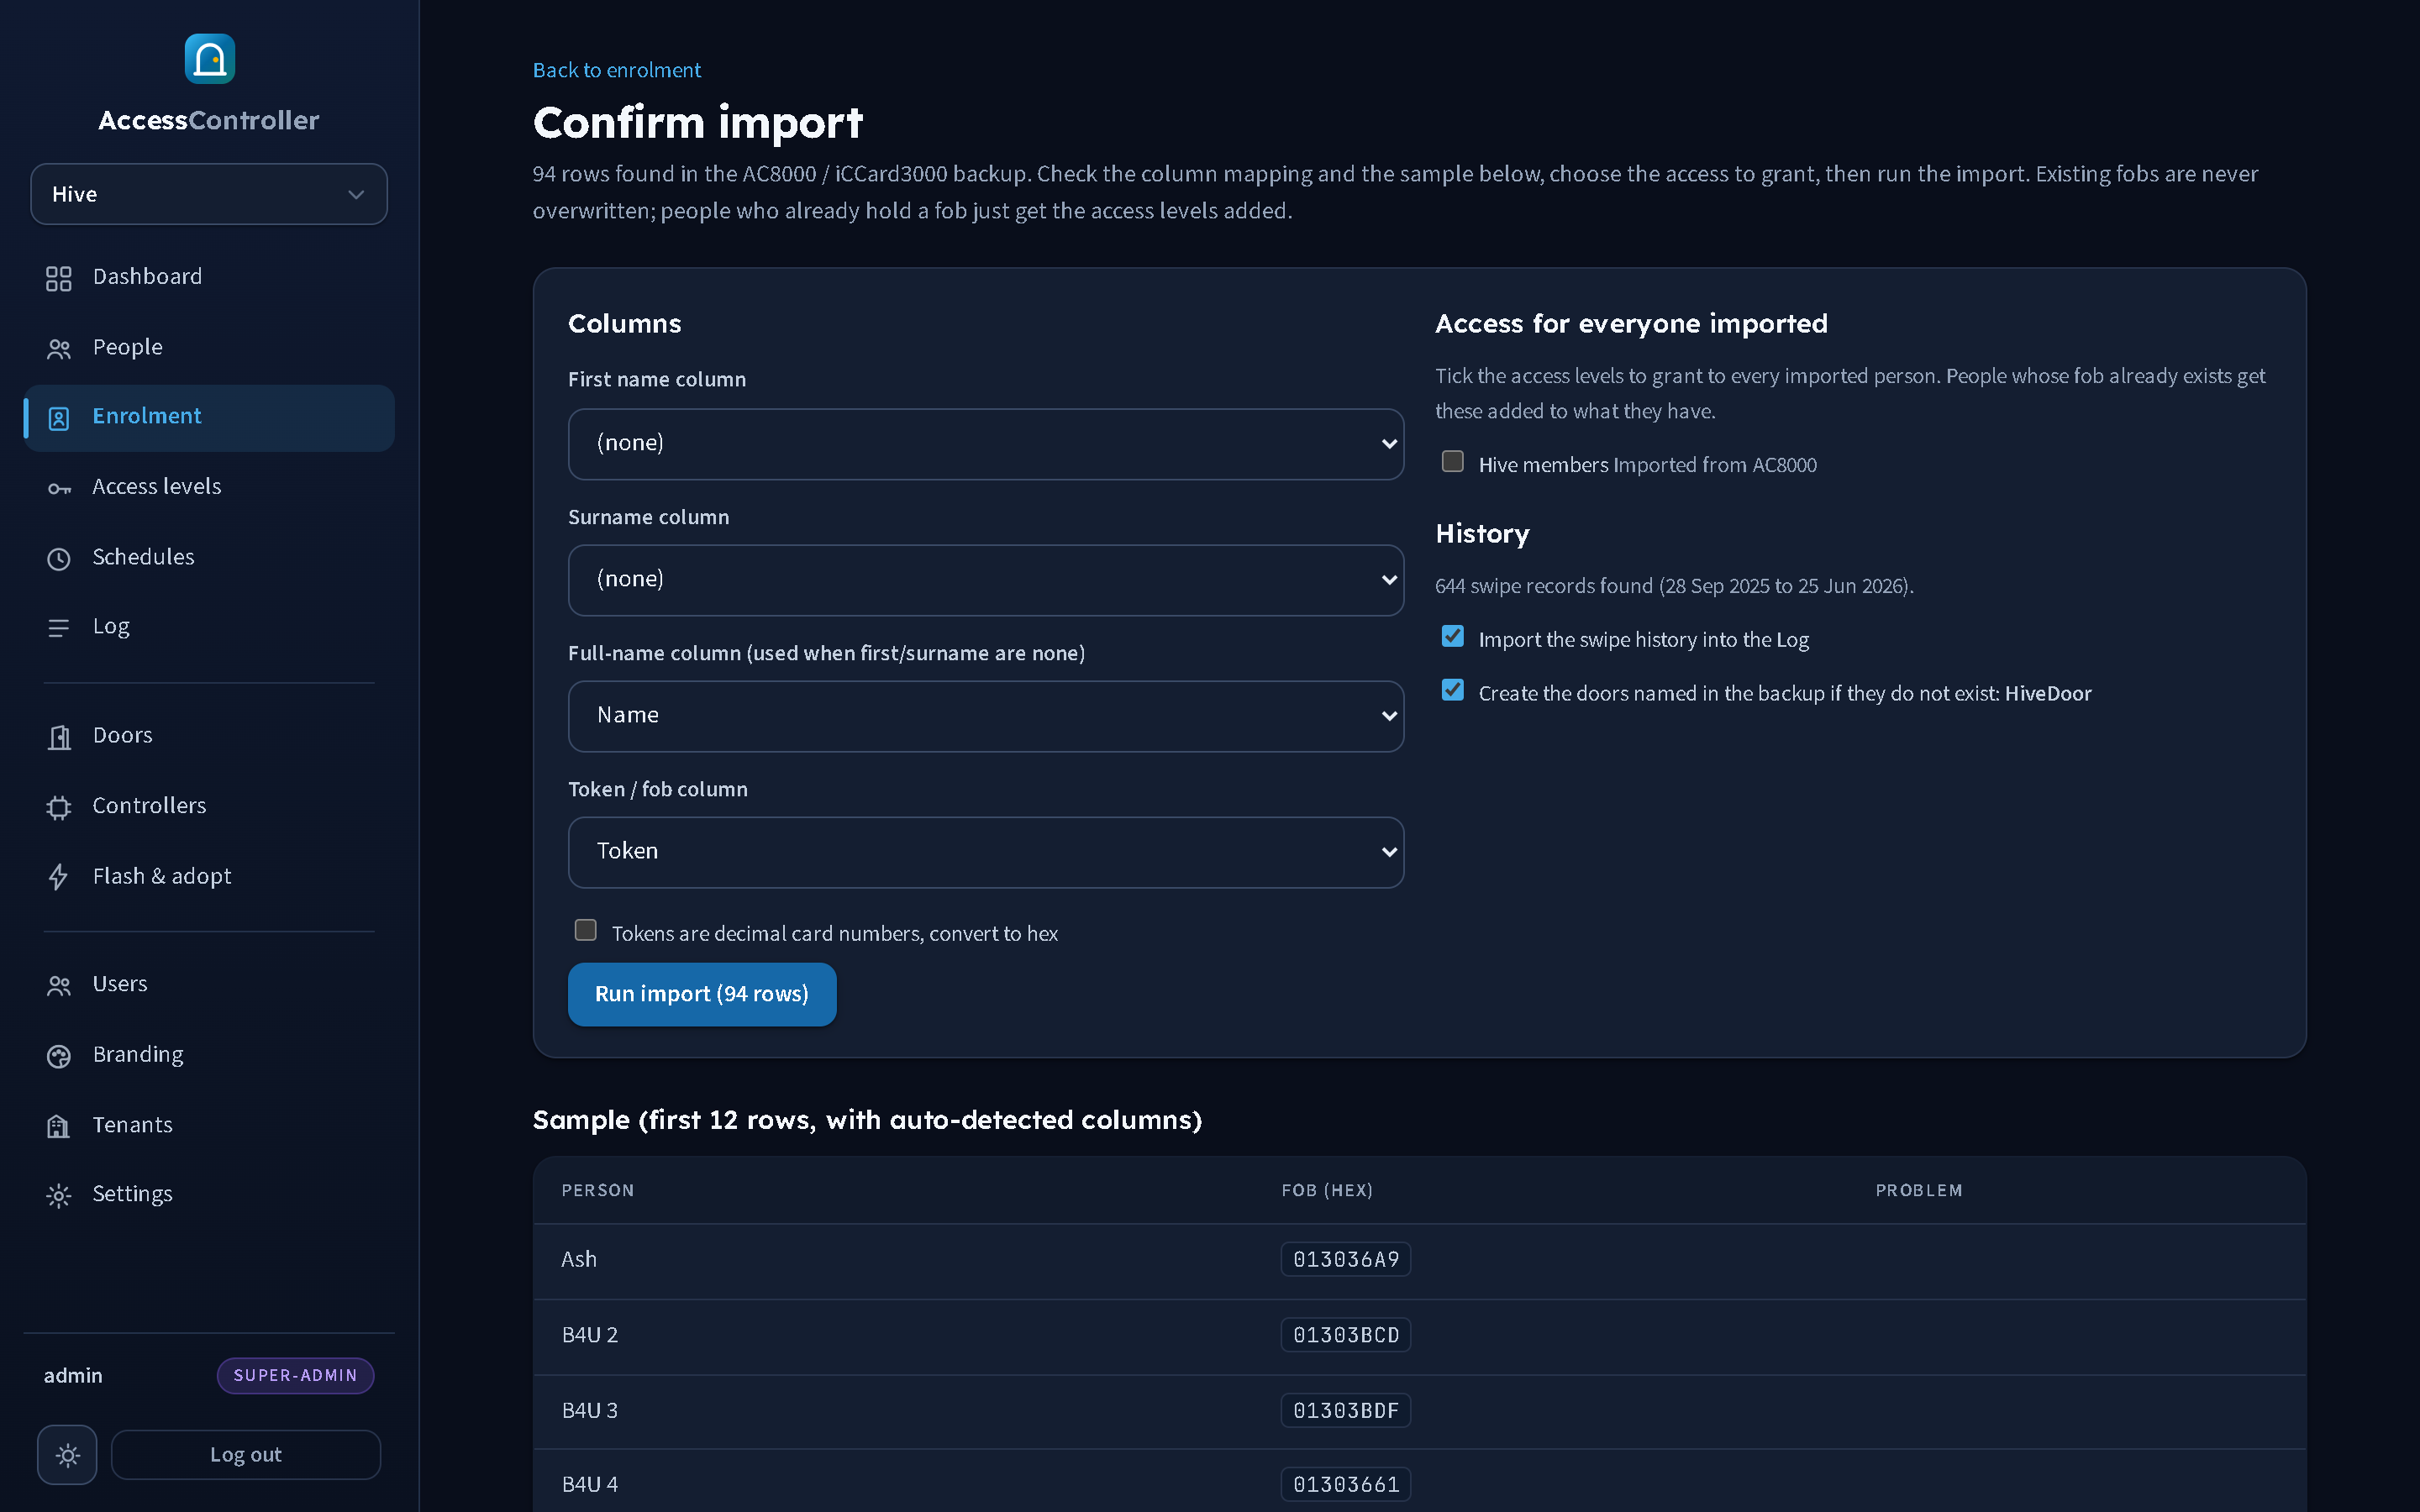
The preview page is the same for both sources. It says how many rows were found (and, for a backup, that they came from the AC8000 / iCCard3000 backup), and shows:
- Columns. For a backup the mapping is already right: Full-name column is Name and Token / fob column is Token, and Tokens are decimal card numbers is unticked because the wizard has already converted them. For a CSV, check and correct the guesses.
- Access for everyone imported. Tick the access levels to grant. New people get exactly these levels. People whose fob already exists on the panel are not re-created and their fob is left alone, but the ticked levels are added to whatever they already hold, so you can safely run the import twice or use it to grant a level in bulk. If the tenant has no levels yet you can import now and assign access later, or create a level first (chapter 7).
- Rows with the same name are one person with several fobs, carried over from the wizard and still changeable here.
- History (only when the backup had swipe records and you left the history ticked). It shows how many records and the date range, with two boxes: Import the swipe history into the Log, and Create these doors if they do not exist. Under the second is one editable text box per door name found in the backup. This is where you tidy up what the old system called things: change
HiveDoortoStudio 2and the door is created under the sensible name, or type the name of a door that already exists on the panel and the history is attached to that door instead of creating a duplicate. Matching is case-insensitive. Untick the box entirely and the history is imported with no door for those names. - Sample: the first 12 rows as they will be imported, under the headings Person, Fob (hex) and Problem. A row with a problem (
empty token,no name, or a code that is not valid) is flagged in red and will be counted as failed.
Press Run import (N rows). Until then nothing has been written; you can go Back to enrolment and start again with different options.
What the import does
- Creates each person and attaches their fob. A fob that already exists in the tenant is skipped (its person keeps their name and other fobs) and only gets the ticked levels added.
- Clears any captured fob on the Enrolment page that matches an imported code.
- Writes the swipe history into the Log if asked, with each record's original date and time, the door, the fob and, where the card belongs to an imported (or existing) person, the person's name. Records the old system granted are logged as granted; the rest as denied with Unknown fob. Every imported row carries "AC8000 history, reader (reader name)" in its detail so it can be told from the panel's own events (chapter 11).
- Creates any missing doors named in the history if asked, described as "Imported from AC8000 backup", with no controller mapped. Map a controller to each on the Doors page (chapter 3) when the new hardware goes in.
- Pushes the new keysets to every door straight away.
The result message on the People page reads, for example, Import done: 94 people created, 94 fobs attached, 0 skipped, 0 failed, 644 history records added to the Log. The same numbers are written to the Log as a system event (CSV import, reason import) whichever source was used.
Tip: the panel matches a fob whether it is stored with 6 or 8 digits (
0136A9and000136A9are the same fob), so a code imported at the wrong width still opens the door when the reader sends the other form. What no setting can fix is a Wiegand 26 reader presented with a card above 16,777,215: it physically cannot send the high bits. See "Imported fobs are denied at the door" in chapter 17.
Check a fob
Two tools tell you what a fob is and what it does:
- Desk scan (People page): whose fob is this? A known fob opens the person; an unknown one goes to enrolment.
- Check access (Dashboard): would this fob open this door at this time, and if not, why? It runs the exact decision rule the controller uses and writes nothing to the log. Enter the code, choose a door, optionally change the date and time, press Check.
Active and inactive
Setting a person's Status to Inactive (all access suspended) stops every fob they hold from opening any door, immediately, without touching the fobs or their levels. The log shows Person inactive for their attempts. They also cannot release doors by phone. Use it for lapsed memberships, suspended accounts and leavers who may come back. Set them back to Active to restore everything exactly as it was.
Inactive people are not counted in the dashboard's "Active people" tile but do appear in the People list with an "inactive" badge.